ARTISTIC APPLICATION Nº2

ARTISTIC APPLICATION Nº1


Links are part of our life. When two geometric figures are tangent, they have continuity with each other. Which generates smooth shapes and without sudden changes.

In the design world they are used frequently:


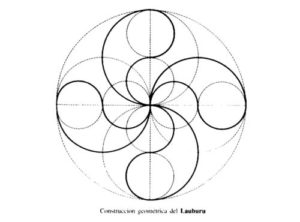
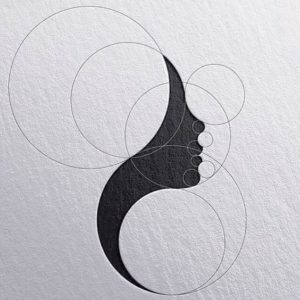
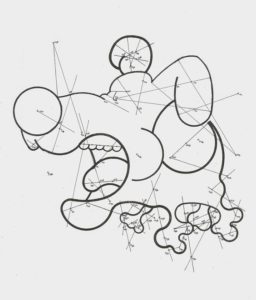
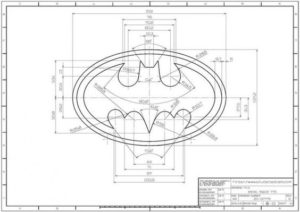
I want you to see these tutorials in this order, they are examples of what you will do later in your sketchbook with other information:

0.Tangencies explanation and rules:

1. First example: Straight line tangent to a circumference:

2. Second example: Two tangent lines to a circumference from an exteranl point P:

3. Third example: External tangent circumference to another circumference:

4. Fourth example: Internal tangent circumference to another circumference:

5. Fifth example: Tangent circumferences to another two circumferences:

We are going to do these exercises in two weeks:

  1. First week: 
    1. nº1: Draw a tangent line to a circumference whose radius measures 4 cm using your compass. Free  tangency point.
    2. nº2: Draw two tangent lines to a circumference whose radius measures 3 cm from an external  P point.  Free  P point.


  1. Second week:
    1. nº3: Draw an external tangent  circumference whose radius measures 2’5 cm to another circumference whose radius measures 4 cm. Free tangency point.
    2. nº4: Draw an internal tangent  circumference whose radius measures 2’5 cm to another circumference whose radius measures 4 cm. Free tangency point.
    3. nº5: Draw two tangent  circumferences whose radius measure 3’5 cm, to another two circumferences whose radius measure 4 and 3cm respectively and the distance between their centers is 9 cm.

This is my musical recommendation for this week:


Remarkable points and straight lines in a triangle

Watch this presentation about the remarkable points and straight lines in a triangle, and then watch the tutorials.


You have to see them in this order:

1)Circumcenter

2) Incenter:

https://youtu.be/vntBHBksIF4

3) Barycenter:

In the three remaining boxes you have to do:

  1. Draw a scalene triangle with free measures and trace its circumcenter.
  2. Draw a right triangle with free measures and trace its incenter
  3. Draw an equilateral triangle with free measures and trace its barycenter.

This is my musical recommendation for this week, Patrick Watson:

We are going to build triangles from some information about their shape.

First of all, do a margin on your sheet and divide it into 6 equal parts
0. Dividing a sheet into 6 equal parts (optional)

Before starting, you have to see the presentation about the triangles and then see the 3 tutorials in this order:

1. Triangles 1: Contruction of a triangle knowing 2 sides and one angle

2. Triangles 2: Contruction of a triangle knowing 2 angles and one side

3. Triangles 3: Contruction of a triangle knowing 3 sides

You have to do these 3 activities:
1. Draw one triangle knowing 2 sides and one angle: AB=8cm; AC=6,5cm and A=30º
2. Draw one triangle knowing 2 angles and one side: AB=7cm; A=30º and B=60º
3. Draw one triangle knowing 3 sides and one angle: AB=7,5cm; AC=4cm and BC=7cm

Finally take a picture of the page and send it to me. Please, take a look to the instruction and take a photo just of the sheet.


LA BIEN QUERIDA is my musical recommendation for today.


Good morning everyone,
We continue with the Thales Theorem.
Last year we did a very nice job applying it to making your name. We are going to do a brief review and we are going to apply it to the construction of regular polygons.

The order you have to follow to watch the videos is as follows:

1. Thales Theorem

2. Doing a margin on the sheet (opcional)

3. Second task : Divide a segment

4. General Method

Finally take a picture to your sheet and send it to me.

This is my musical recomendation for today:

Good morning to everybody.
I hope you have disconnected and rested these two weeks.

I attached two tutorials for the first task:

  • The first tutorial is to make a margin on your notebook sheet or on a normal sheet of paper.
  • The second is the first activity, which will be a review of the parallels.

Remember that you have to take a picture of your exercise with the instruction that I send you. Thank you very much.

I recommend that you put on some nice music to do the exercise, you are going to enjoy it twice. I attached a song by De Pedro. This is my musical recommendation today


Stop motion examples with different techniques.
The penultimate is from a group called OK GO. I recommend all his music videos, they are incredible.
The last one belongs to PES.who is a stop motion genius.


Como ya sabéis el año pasado hicimos un stop motion, por lo que imagino que recordaréis cómo se hace.

En cualquier caso os adjunto un vídeo tutorial de cómo hacerlo.

Esta nueva actividad consiste en grabar una pequeña historia en stopmotion, os lo he detallado todo en Classroom:

  1. Lluvia de ideas
  2. Escribir la historia
  3. Story board (entrega de story board e historia este viernes)

Recordatorio de los tipos de plano que hay y de las angulaciones, para que no lo grabéis todo en plano general.


4. Proceso de grabación con Stop motion

5. Edición con cualquier programa de edición de vídeo: poner título, música, efectos de sonido o voz en off si fuera necesario. (Entrega el viernes día 3 de abril)


Esta semana los alumnos de 2º ESO A,B y CX pueden aportar su granito de arena a la instalación que estábamos preparando para el Día del Libro que será el 25 de abril, esperemos estar en esa fecha de vuelta.

Los alumnos de 1º ESO estaban realizando unas casitas para pájaros preciosas que iban acompañadas de bandadas de pájaros de papel.

Ya teníamos unos cuantos pájaros listos para colgar, pero necesitamos más….

Por este motivo la actividad de esta semana consiste en realizar 5 pájaros por alumno, con papeles que pueden ser de colores o blancos, que podéis decorar, pero al mismo tiempo, tenéis que escribir en el papel un párrafo de un libro que os haya gustado mucho.

En este vídeo podéis ver cómo se hace un pájaro de una manera sencilla.


He hecho una tarea en el Classroom con toda la información necesaria.

A la vuelta, con todos estos pájaros y las casitas montaremos la instalación.

Buenos días, soy Sofía e iré subiendo las actividades relacionadas con la asignatura de Plástica en el blog del Departamento de Dibujo.

Con 2º ESO estábamos haciendo unas máscaras de carnaval por grupos, trabajo que la mayoría no ha podido acabar pero que cuando todo esto acabe nos pondremos con ellas porque estaban quedando preciosas.

También tenemos pendiente otro trabajo sobre redes modulares, estampación y elaboración de un monedero, que retomaremos a la vuelta.