We are going to fill the fourth table with a monochromatic range, this means that we are going to play with the darkness and luminosity of a color.
Choose a color among the primaries; yellow, magenta, or blue; or between the secondary ones; green, purple or red.
And now start watching this tutorial:
This is the artistic application of the monochrome range:
HOW TO CREATE A SENSATION OF DEPTH
We are going to choose a color, and we are going to make a monochrome range.
For them we are going to paint the middle box with the pure color, for example blue, from left to right we are going to press the pencil less and less until we reach white. This strip of colors is brighter than the other.
From right to left we are going to press the pencil more and more and we are going to mix it with pencil 2b, to darken it even more. With this strip of colors we are playing with color saturation, the more mixed the color the less saturation it will have. If the color is purer, it is more saturated and if it is more mixed it will be less saturated.
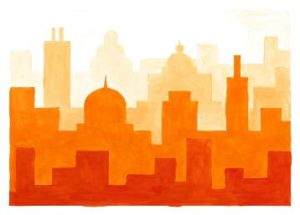
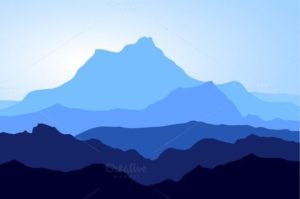
We can apply the monochrome color table to create a feeling of depth, for example in a landscape with mountains located at different distances.
If we replace the mountains by buildings we get an urban landscape.
If you look, the mountains or the buildings the further away they are the more brightness or luminosity they have and the closer they are the less saturated they are, so we will have to mix them with black.
To do this exercise I offer you two options:
1. A drawing using the silhouette of your hands.
2. A drawing using a symmetrical figure cut out of cardboard as a silhouette.
You can use all the colored pencils you have but divide them between warm and cold colors. If you don’t have many colors you can mix them to get more shades.
This is my musical recommendation of the week, Jarabe de Palo.
We are going to complete the 2nd and the 3rd table that we made two weeks ago, the 1st one has the gray scale.
In the 2nd table we are going to make a range of warm colors.
In the 3rd table a range of cool colors.
You can only use your colored pencils and the 3 primary colors, yellow, magenta ( REMEMBER THAT IF YOU DON’T HAVE THIS COLOR YOU CAN USE RED) and cyan blue.
You have to see the tutorials in this order:
1. Warm range
2. Cold range
There are also two documents with more information about colors that we’ll see in the online class.
Finally, take a picture to your exercise and send it to me.
This is my musical recommendation for this week, is Pedropiedra I hope you enjoy it.
The painters and draftsmen use the gray scale to give a feeling of three-dimensionality and volume to the two-dimensional drawings they make on paper or canvas, the examples are endless.
In this activity we will first draw a cube on a blank sheet and we will shade it to give it more volume and realism.
After the cube, which has planes and edges, we will move on to the sphere, whose surface is smoother.
Giving volume to a smooth surface is more complicated, so I put it second.
Watch the tutorials in this order:
1. Doing a margin on the sheet. This is the first one because you have to do a margin on your sheet.
2. Shading a cube
3. Shading a sphere
When you finish the exercises take a picture of your page following the instruction that a send you.
This is my musical recommendation today ; “Tierra” by Xoel López, that reminds us that everything has its end even this strange situation.
Good morning to everybody.
I hope you have disconnected and rested these two weeks.
We will see these two tutorials:
The first one is to make 5 boxes on a sheet, can be on a scketchbook sheet or on a normal sheet.
The second one is to learn how to make a grey scale.
Remember that you have to take a picture of your exercise with the instruction that I send you.
I recommend that you put on some nice music to do the exercise, you are going to enjoy it twice. I attached a song by De Pedro. This is my musical recommendation today
Esta actividad consiste en hacer un stop motion básico para conocer la técnica del stop motion. Una vez sepamos hacer esto, podremos hacer lo que queramos, todo depende de las ganas que tenga cada uno de hacer una historia más o menos compleja.
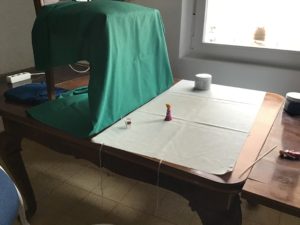
Lo primero que vais a hacer es un pequeño set de rodaje con telas o cartulinas:
Bájate la aplicación Stop motion al móvil o tablet, es gratis.
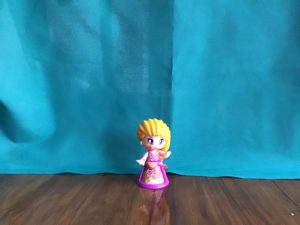
Elije un objeto de casa, yo lo he hecho con una muñeca de pin y pon.
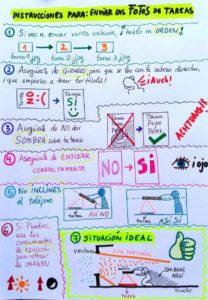
Colócala en tu set de rodaje y haz la primera foto con la aplicación de Stop motion, no cambies el punto de vista de la cámara, haz un buen enfoque siempre en posición horizontal, intenta eliminar todo aquello que sobre, que aparezca únicamente el objeto que va a girar.
Haz una foto de cada pequeño movimiento que hagas sin cambiar el punto de vista de la cámara, esto último es muy importante. NO MUEVAS EL PUNTO DE VISTA DE LA CÁMARA:
Unavez que hayas girado 360º el objeto pulsa a play y verás el resultado.
Exporta la película y ábrela en un programa de edición de vídeo, hay muchos.
Stop motion examples with different techniques.
The penultimate is from a group called OK GO. I recommend all his music videos, they are incredible.
The last one belongs to PES.who is a stop motion genius.
Como ya sabéis el año pasado hicimos un stop motion, por lo que imagino que recordaréis cómo se hace.
En cualquier caso os adjunto un vídeo tutorial de cómo hacerlo.
Esta nueva actividad consiste en grabar una pequeña historia en stopmotion, os lo he detallado todo en Classroom:
Lluvia de ideas
Escribir la historia
Story board (entrega de story board e historia este viernes)
Recordatorio de los tipos de plano que hay y de las angulaciones, para que no lo grabéis todo en plano general.
5. Edición con cualquier programa de edición de vídeo: poner título, música, efectos de sonido o voz en off si fuera necesario. (Entrega el viernes día 3 de abril)
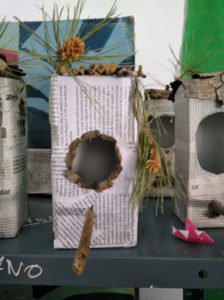
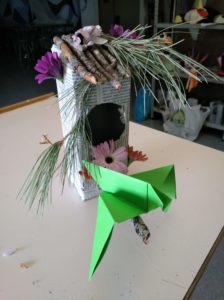
Los alumnos de 1º ESO han estado trabajando en la instalación para el Día del Libro que será el 25 de abril. Están realizando unas casas para pájaros preciosas como podéis comprobar:
Para completar la instalación tienen que hacer 5 pájaros con papeles de colores o papel blanco, pero antes de ponerse a doblar el papel, tienen que escribir en ellos párrafos de libros que les hayan gustado, y también pueden decorarlos. Con lo que sobre del folio pueden hacer pajaritos más pequeños que quedan muy bonitos.
Os adjunto un vídeo de cómo se hace un pájaro de una manera sencilla, si alguien prefiere ir más allá y hacer algo más complejo en papiroflexia mucho mejor.
He hecho una tarea en Classroom con todo más detallado.
This website uses cookies and asks your personal data to enhance your browsing experience. We are committed to protecting your privacy and ensuring your data is handled in compliance with the General Data Protection Regulation (GDPR).